


注意
跳轉到末尾 下載完整的示例程式碼。
PyTorch 中 non_blocking 和 pin_memory() 的正確使用指南#
創建於: 2024年7月31日 | 最後更新: 2025年3月18日 | 最後驗證: 2024年11月5日
簡介#
在許多 PyTorch 應用中,將資料從 CPU 傳輸到 GPU 是至關重要的。使用者理解用於在裝置之間移動資料的最有效工具和選項至關重要。本教程將探討 PyTorch 中裝置到裝置資料傳輸的兩個關鍵方法:pin_memory() 和帶有 non_blocking=True 選項的 to()。
你將學到什麼#
透過非同步傳輸和記憶體固定可以最佳化張量從 CPU 到 GPU 的傳輸。然而,有一些重要的注意事項
使用
tensor.pin_memory().to(device, non_blocking=True)可能比直接使用tensor.to(device)慢兩倍。通常,
tensor.to(device, non_blocking=True)是提高傳輸速度的有效選擇。雖然
cpu_tensor.to("cuda", non_blocking=True).mean()可以正確執行,但嘗試cuda_tensor.to("cpu", non_blocking=True).mean()會導致輸出錯誤。
前言#
本教程中報告的效能取決於用於構建教程的系統。雖然結論適用於不同系統,但具體觀察結果可能因可用硬體而略有不同,尤其是在舊硬體上。本教程的主要目標是提供一個理論框架來理解 CPU 到 GPU 的資料傳輸。然而,任何設計決策都應針對個別情況進行調整,並以基準測試的吞吐量測量以及手頭任務的具體要求為指導。
import torch

assert torch.cuda.is_available(), "A cuda device is required to run this tutorial"
本教程需要安裝 tensordict。如果你的環境中還沒有 tensordict,請在單獨的單元格中執行以下命令進行安裝
# Install tensordict with the following command
!pip3 install tensordict
我們首先概述這些概念的理論,然後進行具體的功能測試示例。
背景#
記憶體管理基礎#
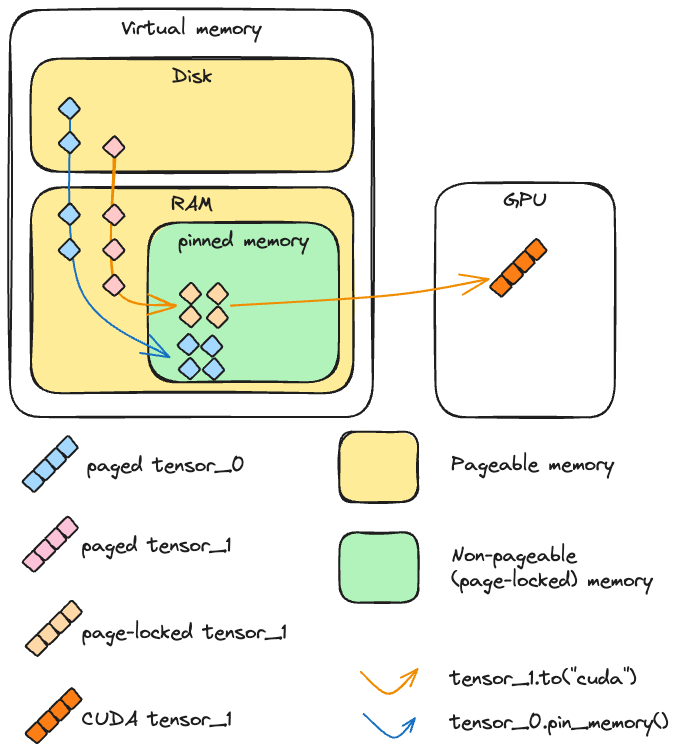
當在 PyTorch 中建立一個 CPU 張量時,該張量的內容需要放置在記憶體中。這裡我們談論的記憶體是一個相當複雜的概念,值得仔細研究。我們區分由記憶體管理單元處理的兩種型別的記憶體:RAM(為簡化起見)和磁碟上的交換空間(可能是硬碟驅動器,也可能不是)。磁碟和 RAM(物理記憶體)中的可用空間共同構成了虛擬記憶體,這是可用總資源的抽象。簡而言之,虛擬記憶體使得可用空間比單獨的 RAM 要大,併產生了主記憶體比實際更大的幻覺。
在正常情況下,常規 CPU 張量是可分頁的,這意味著它被分成稱為頁的塊,這些塊可以位於虛擬記憶體中的任何位置(RAM 或磁碟)。如前所述,這樣做的好處是記憶體看起來比實際主記憶體要大。
通常,當程式訪問不在 RAM 中的頁面時,會發生“頁面錯誤”,然後作業系統(OS)會將該頁面帶回到 RAM(“交換入”或“頁面入”)。反過來,作業系統可能需要將另一頁“交換出去”(或“頁面出去”),以便為新頁面騰出空間。
與可分頁記憶體相反,固定記憶體(或頁面鎖定記憶體或不可分頁記憶體)是一種不能被交換到磁碟的記憶體型別。它允許更快、更可預測的訪問時間,但缺點是它比可分頁記憶體(又名主記憶體)更有限。
CUDA 和(非)可分頁記憶體#
為了理解 CUDA 如何將張量從 CPU 複製到 CUDA,我們來考慮以上兩種情況
如果記憶體是頁面鎖定的,裝置可以直接訪問主記憶體中的記憶體。記憶體地址定義明確,需要讀取這些資料的函式可以顯著加速。
如果記憶體是可分頁的,所有頁面都必須先放入主記憶體,然後才能傳送到 GPU。此操作可能需要時間,並且不如在頁面鎖定張量上執行時那樣可預測。
更具體地說,當 CUDA 將可分頁資料從 CPU 傳送到 GPU 時,它必須先建立該資料的頁面鎖定副本,然後再進行傳輸。
使用 non_blocking=True 的非同步與同步操作(CUDA cudaMemcpyAsync)#
在執行從主機(例如 CPU)到裝置(例如 GPU)的複製時,CUDA 工具包提供了同步或非同步相對於主機的操作模式。
實際上,當呼叫 to() 時,PyTorch 總是呼叫 cudaMemcpyAsync。如果 non_blocking=False(預設),在每次 cudaMemcpyAsync 之後都會呼叫 cudaStreamSynchronize,使得呼叫 to() 在主執行緒中是阻塞的。如果 non_blocking=True,則不會觸發同步,並且主機上的主執行緒不會被阻塞。因此,從主機的角度來看,可以同時傳送多個張量到裝置,因為執行緒不必等待一個傳輸完成才能開始另一個。
注意
通常,傳輸在裝置端是阻塞的(即使在主機端不是):複製在裝置上不能在執行另一個操作時進行。但是,在某些高階場景中,可以在 GPU 端同時進行復制和核心執行。如下面的示例所示,要實現這一點,必須滿足三個要求
裝置必須至少有一個免費的 DMA(直接記憶體訪問)引擎。現代 GPU 架構,如 Volterra、Tesla 或 H100 裝置,擁有多個 DMA 引擎。
傳輸必須在一個獨立的、非預設的 CUDA 流上進行。在 PyTorch 中,可以使用
Stream來處理 CUDA 流。源資料必須在固定記憶體中。
我們透過在以下指令碼上執行配置檔案來演示這一點。
import contextlib

from torch.cuda import Stream


s = Stream()

torch.manual_seed(42)
t1_cpu_pinned = torch.randn(1024**2 * 5, pin_memory=True)
t2_cpu_paged = torch.randn(1024**2 * 5, pin_memory=False)
t3_cuda = torch.randn(1024**2 * 5, device="cuda:0")

assert torch.cuda.is_available()
device = torch.device("cuda", torch.cuda.current_device())


# The function we want to profile
def inner(pinned: bool, streamed: bool):
    with torch.cuda.stream(s) if streamed else contextlib.nullcontext():
        if pinned:
            t1_cuda = t1_cpu_pinned.to(device, non_blocking=True)
        else:
            t2_cuda = t2_cpu_paged.to(device, non_blocking=True)
        t_star_cuda_h2d_event = s.record_event()
    # This operation can be executed during the CPU to GPU copy if and only if the tensor is pinned and the copy is
    #  done in the other stream
    t3_cuda_mul = t3_cuda * t3_cuda * t3_cuda
    t3_cuda_h2d_event = torch.cuda.current_stream().record_event()
    t_star_cuda_h2d_event.synchronize()
    t3_cuda_h2d_event.synchronize()


# Our profiler: profiles the `inner` function and stores the results in a .json file
def benchmark_with_profiler(
    pinned,
    streamed,
) -> None:
    torch._C._profiler._set_cuda_sync_enabled_val(True)
    wait, warmup, active = 1, 1, 2
    num_steps = wait + warmup + active
    rank = 0
    with torch.profiler.profile(
        activities=[
            torch.profiler.ProfilerActivity.CPU,
            torch.profiler.ProfilerActivity.CUDA,
        ],
        schedule=torch.profiler.schedule(
            wait=wait, warmup=warmup, active=active, repeat=1, skip_first=1
        ),
    ) as prof:
        for step_idx in range(1, num_steps + 1):
            inner(streamed=streamed, pinned=pinned)
            if rank is None or rank == 0:
                prof.step()
    prof.export_chrome_trace(f"trace_streamed{int(streamed)}_pinned{int(pinned)}.json")
在 Chrome 中載入這些配置檔案跟蹤(chrome://tracing)會顯示以下結果:首先,讓我們看看在主流中將可分頁張量傳送到 GPU 之後,t3_cuda 上的算術運算是如何執行的
benchmark_with_profiler(streamed=False, pinned=False)

使用固定記憶體張量對跟蹤的改變不大,兩個操作仍然是連續執行的
benchmark_with_profiler(streamed=False, pinned=True)

在單獨的流上將可分頁張量傳送到 GPU 也是一個阻塞操作
benchmark_with_profiler(streamed=True, pinned=False)

只有固定張量以獨立流的形式複製到 GPU 時,才能與其他在主流上執行的 CUDA 核心重疊
benchmark_with_profiler(streamed=True, pinned=True)

PyTorch 的視角#
pin_memory()#
PyTorch 透過 pin_memory() 方法和建構函式引數提供了建立張量並將其傳送到頁面鎖定記憶體的可能性。在 CUDA 已初始化的機器上,可以透過 pin_memory() 方法將 CPU 張量轉換為固定記憶體。重要的是,pin_memory 在主機的宿主執行緒上是阻塞的:它會等待張量複製到頁面鎖定記憶體後才執行下一個操作。新張量可以直接在固定記憶體中建立,使用 zeros()、ones() 和其他建構函式。
讓我們檢查固定記憶體和將張量傳送到 CUDA 的速度
import torch
import gc
from torch.utils.benchmark import Timer
import matplotlib.pyplot as plt


def timer(cmd):
    median = (
        Timer(cmd, globals=globals())
        .adaptive_autorange(min_run_time=1.0, max_run_time=20.0)
        .median
        * 1000
    )
    print(f"{cmd}: {median: 4.4f} ms")
    return median


# A tensor in pageable memory
pageable_tensor = torch.randn(1_000_000)

# A tensor in page-locked (pinned) memory
pinned_tensor = torch.randn(1_000_000, pin_memory=True)

# Runtimes:
pageable_to_device = timer("pageable_tensor.to('cuda:0')")
pinned_to_device = timer("pinned_tensor.to('cuda:0')")
pin_mem = timer("pageable_tensor.pin_memory()")
pin_mem_to_device = timer("pageable_tensor.pin_memory().to('cuda:0')")

# Ratios:
r1 = pinned_to_device / pageable_to_device
r2 = pin_mem_to_device / pageable_to_device

# Create a figure with the results
fig, ax = plt.subplots()

xlabels = [0, 1, 2]
bar_labels = [
    "pageable_tensor.to(device) (1x)",
    f"pinned_tensor.to(device) ({r1:4.2f}x)",
    f"pageable_tensor.pin_memory().to(device) ({r2:4.2f}x)"
    f"\npin_memory()={100*pin_mem/pin_mem_to_device:.2f}% of runtime.",
]
values = [pageable_to_device, pinned_to_device, pin_mem_to_device]
colors = ["tab:blue", "tab:red", "tab:orange"]
ax.bar(xlabels, values, label=bar_labels, color=colors)

ax.set_ylabel("Runtime (ms)")
ax.set_title("Device casting runtime (pin-memory)")
ax.set_xticks([])
ax.legend()

plt.show()

# Clear tensors
del pageable_tensor, pinned_tensor
_ = gc.collect()
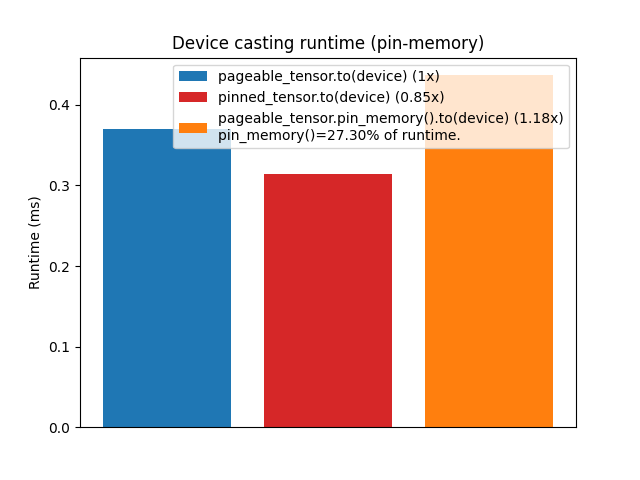
pageable_tensor.to('cuda:0'):  0.3698 ms
pinned_tensor.to('cuda:0'):  0.3148 ms
pageable_tensor.pin_memory():  0.1193 ms
pageable_tensor.pin_memory().to('cuda:0'):  0.4369 ms
我們可以觀察到,將固定記憶體張量轉換為 GPU 確實比可分頁張量快得多,因為在底層,可分頁張量在傳送到 GPU 之前必須複製到固定記憶體。
然而,與普遍的看法相反,在將可分頁張量轉換為 GPU 之前呼叫 pin_memory() 不應帶來任何顯著的速度提升,相反,此呼叫通常比僅執行傳輸慢。這是有道理的,因為我們實際上是在要求 Python 執行 CUDA 實際上會執行的操作,然後再將資料從主機複製到裝置。
注意
pin_memory 的 PyTorch 實現依賴於透過 cudaHostAlloc 建立固定記憶體中的全新儲存,在極少數情況下,可能比 cudaMemcpy 分塊傳輸資料更快。同樣,觀察結果可能因可用硬體、傳送的張量大小或可用 RAM 量而異。
non_blocking=True#
如前所述,許多 PyTorch 操作都可以透過 non_blocking 引數以相對於主機的非同步方式執行。
在這裡,為了準確評估使用 non_blocking 的好處,我們將設計一個稍微複雜的實驗,因為我們想評估在呼叫 non_blocking 和不呼叫 non_blocking 的情況下,將多個張量傳送到 GPU 的速度。
# A simple loop that copies all tensors to cuda
def copy_to_device(*tensors):
    result = []
    for tensor in tensors:
        result.append(tensor.to("cuda:0"))
    return result


# A loop that copies all tensors to cuda asynchronously
def copy_to_device_nonblocking(*tensors):
    result = []
    for tensor in tensors:
        result.append(tensor.to("cuda:0", non_blocking=True))
    # We need to synchronize
    torch.cuda.synchronize()
    return result


# Create a list of tensors
tensors = [torch.randn(1000) for _ in range(1000)]
to_device = timer("copy_to_device(*tensors)")
to_device_nonblocking = timer("copy_to_device_nonblocking(*tensors)")

# Ratio
r1 = to_device_nonblocking / to_device

# Plot the results
fig, ax = plt.subplots()

xlabels = [0, 1]
bar_labels = [f"to(device) (1x)", f"to(device, non_blocking=True) ({r1:4.2f}x)"]
colors = ["tab:blue", "tab:red"]
values = [to_device, to_device_nonblocking]

ax.bar(xlabels, values, label=bar_labels, color=colors)

ax.set_ylabel("Runtime (ms)")
ax.set_title("Device casting runtime (non-blocking)")
ax.set_xticks([])
ax.legend()

plt.show()
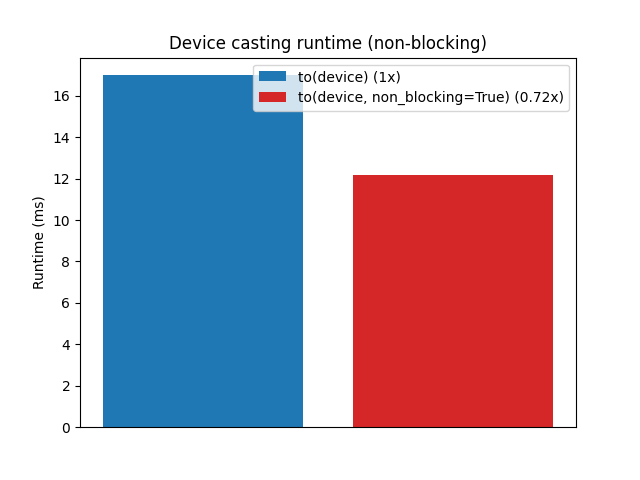
copy_to_device(*tensors):  16.9939 ms
copy_to_device_nonblocking(*tensors):  12.1922 ms
為了更好地理解這裡發生的情況,讓我們分析這兩個函式
from torch.profiler import profile, ProfilerActivity


def profile_mem(cmd):
    with profile(activities=[ProfilerActivity.CPU]) as prof:
        exec(cmd)
    print(cmd)
    print(prof.key_averages().table(row_limit=10))
讓我們先看看常規 to(device) 的呼叫堆疊
print("Call to `to(device)`", profile_mem("copy_to_device(*tensors)"))
copy_to_device(*tensors)
-------------------------  ------------  ------------  ------------  ------------  ------------  ------------
                     Name    Self CPU %      Self CPU   CPU total %     CPU total  CPU time avg    # of Calls
-------------------------  ------------  ------------  ------------  ------------  ------------  ------------
                 aten::to         5.74%       1.263ms       100.00%      21.999ms      21.999us          1000
           aten::_to_copy        12.20%       2.685ms        94.26%      20.736ms      20.736us          1000
      aten::empty_strided        20.50%       4.510ms        20.50%       4.510ms       4.510us          1000
              aten::copy_        21.80%       4.797ms        61.56%      13.542ms      13.542us          1000
          cudaMemcpyAsync        16.87%       3.710ms        16.87%       3.710ms       3.710us          1000
    cudaStreamSynchronize        22.88%       5.034ms        22.88%       5.034ms       5.034us          1000
-------------------------  ------------  ------------  ------------  ------------  ------------  ------------
Self CPU time total: 21.999ms

Call to `to(device)` None
現在是 non_blocking 版本
print(
    "Call to `to(device, non_blocking=True)`",
    profile_mem("copy_to_device_nonblocking(*tensors)"),
)
copy_to_device_nonblocking(*tensors)
-------------------------  ------------  ------------  ------------  ------------  ------------  ------------
                     Name    Self CPU %      Self CPU   CPU total %     CPU total  CPU time avg    # of Calls
-------------------------  ------------  ------------  ------------  ------------  ------------  ------------
                 aten::to         7.25%       1.268ms        99.86%      17.457ms      17.457us          1000
           aten::_to_copy        15.64%       2.734ms        92.61%      16.189ms      16.189us          1000
      aten::empty_strided        25.92%       4.531ms        25.92%       4.531ms       4.531us          1000
              aten::copy_        29.83%       5.216ms        51.05%       8.924ms       8.924us          1000
          cudaMemcpyAsync        21.21%       3.708ms        21.21%       3.708ms       3.708us          1000
    cudaDeviceSynchronize         0.14%      24.411us         0.14%      24.411us      24.411us             1
-------------------------  ------------  ------------  ------------  ------------  ------------  ------------
Self CPU time total: 17.482ms

Call to `to(device, non_blocking=True)` None
使用 non_blocking=True 時,結果無疑更好,因為所有傳輸都在主機端同時啟動,並且只進行一次同步。
收益將取決於張量的數量和大小,以及所使用的硬體。
注意
有趣的是,阻塞的 to("cuda") 實際上執行了與 non_blocking=True 相同的非同步裝置轉換操作(cudaMemcpyAsync),只是每次複製後都進行了同步點。
協同作用#
現在我們已經明確了,將已經固定在記憶體中的張量傳輸到 GPU 比從可分頁記憶體傳輸更快,並且我們知道非同步執行這些傳輸也比同步執行更快,我們可以對這些方法的組合進行基準測試。首先,讓我們編寫幾個新函式來對每個張量呼叫 pin_memory 和 to(device)
def pin_copy_to_device(*tensors):
    result = []
    for tensor in tensors:
        result.append(tensor.pin_memory().to("cuda:0"))
    return result


def pin_copy_to_device_nonblocking(*tensors):
    result = []
    for tensor in tensors:
        result.append(tensor.pin_memory().to("cuda:0", non_blocking=True))
    # We need to synchronize
    torch.cuda.synchronize()
    return result
使用 pin_memory() 的好處在相對較大的批次和較大的張量上更為明顯
tensors = [torch.randn(1_000_000) for _ in range(1000)]
page_copy = timer("copy_to_device(*tensors)")
page_copy_nb = timer("copy_to_device_nonblocking(*tensors)")

tensors_pinned = [torch.randn(1_000_000, pin_memory=True) for _ in range(1000)]
pinned_copy = timer("copy_to_device(*tensors_pinned)")
pinned_copy_nb = timer("copy_to_device_nonblocking(*tensors_pinned)")

pin_and_copy = timer("pin_copy_to_device(*tensors)")
pin_and_copy_nb = timer("pin_copy_to_device_nonblocking(*tensors)")

# Plot
strategies = ("pageable copy", "pinned copy", "pin and copy")
blocking = {
    "blocking": [page_copy, pinned_copy, pin_and_copy],
    "non-blocking": [page_copy_nb, pinned_copy_nb, pin_and_copy_nb],
}

x = torch.arange(3)
width = 0.25
multiplier = 0


fig, ax = plt.subplots(layout="constrained")

for attribute, runtimes in blocking.items():
    offset = width * multiplier
    rects = ax.bar(x + offset, runtimes, width, label=attribute)
    ax.bar_label(rects, padding=3, fmt="%.2f")
    multiplier += 1

# Add some text for labels, title and custom x-axis tick labels, etc.
ax.set_ylabel("Runtime (ms)")
ax.set_title("Runtime (pin-mem and non-blocking)")
ax.set_xticks([0, 1, 2])
ax.set_xticklabels(strategies)
plt.setp(ax.get_xticklabels(), rotation=45, ha="right", rotation_mode="anchor")
ax.legend(loc="upper left", ncols=3)

plt.show()

del tensors, tensors_pinned
_ = gc.collect()
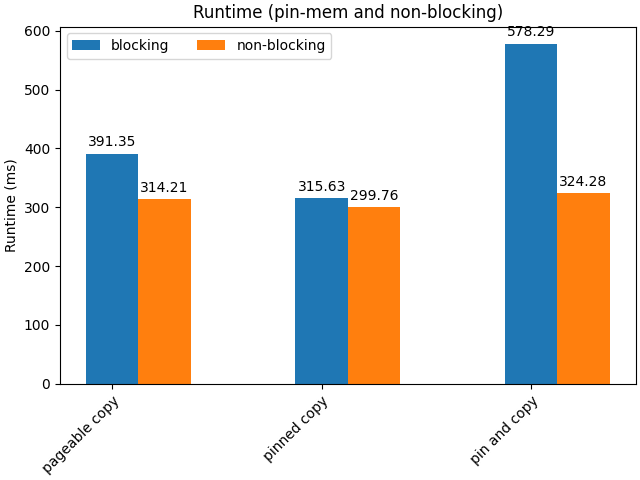
copy_to_device(*tensors):  391.3498 ms
copy_to_device_nonblocking(*tensors):  314.2053 ms
copy_to_device(*tensors_pinned):  315.6334 ms
copy_to_device_nonblocking(*tensors_pinned):  299.7579 ms
pin_copy_to_device(*tensors):  578.2854 ms
pin_copy_to_device_nonblocking(*tensors):  324.2843 ms
其他複製方向(GPU -> CPU,CPU -> MPS)#
到目前為止,我們一直假設從 CPU 到 GPU 的非同步複製是安全的。這通常是正確的,因為 CUDA 會自動處理同步,以確保在讀取時訪問的資料有效 __無論張量是否在可分頁 記憶體中__。
然而,在其他情況下,我們不能做同樣的假設:當張量被放置在固定記憶體中時,在呼叫主機到裝置傳輸後修改原始副本可能會損壞 GPU 上接收到的資料。類似地,當傳輸在相反方向進行時,從 GPU 到 CPU,或從任何非 CPU 或 GPU 的裝置傳輸到任何非 CUDA 處理的 GPU(例如 MPS)的裝置時,如果沒有顯式同步,則無法保證 GPU 上讀取的資料有效。
在這些情況下,這些傳輸不保證在資料訪問時複製已完成。因此,主機上的資料可能不完整或不正確,有效地使其成為垃圾。
我們首先用固定記憶體張量來演示這一點
DELAY = 100000000
try:
    i = -1
    for i in range(100):
        # Create a tensor in pin-memory
        cpu_tensor = torch.ones(1024, 1024, pin_memory=True)
        torch.cuda.synchronize()
        # Send the tensor to CUDA
        cuda_tensor = cpu_tensor.to("cuda", non_blocking=True)
        torch.cuda._sleep(DELAY)
        # Corrupt the original tensor
        cpu_tensor.zero_()
        assert (cuda_tensor == 1).all()
    print("No test failed with non_blocking and pinned tensor")
except AssertionError:
    print(f"{i}th test failed with non_blocking and pinned tensor. Skipping remaining tests")
1th test failed with non_blocking and pinned tensor. Skipping remaining tests
使用可分頁張量始終有效
i = -1
for i in range(100):
    # Create a tensor in pageable memory
    cpu_tensor = torch.ones(1024, 1024)
    torch.cuda.synchronize()
    # Send the tensor to CUDA
    cuda_tensor = cpu_tensor.to("cuda", non_blocking=True)
    torch.cuda._sleep(DELAY)
    # Corrupt the original tensor
    cpu_tensor.zero_()
    assert (cuda_tensor == 1).all()
print("No test failed with non_blocking and pageable tensor")
No test failed with non_blocking and pageable tensor
現在讓我們演示一下,沒有同步,CUDA 到 CPU 也無法產生可靠的輸出
tensor = (
    torch.arange(1, 1_000_000, dtype=torch.double, device="cuda")
    .expand(100, 999999)
    .clone()
)
torch.testing.assert_close(
    tensor.mean(), torch.tensor(500_000, dtype=torch.double, device="cuda")
), tensor.mean()
try:
    i = -1
    for i in range(100):
        cpu_tensor = tensor.to("cpu", non_blocking=True)
        torch.testing.assert_close(
            cpu_tensor.mean(), torch.tensor(500_000, dtype=torch.double)
        )
    print("No test failed with non_blocking")
except AssertionError:
    print(f"{i}th test failed with non_blocking. Skipping remaining tests")
try:
    i = -1
    for i in range(100):
        cpu_tensor = tensor.to("cpu", non_blocking=True)
        torch.cuda.synchronize()
        torch.testing.assert_close(
            cpu_tensor.mean(), torch.tensor(500_000, dtype=torch.double)
        )
    print("No test failed with synchronize")
except AssertionError:
    print(f"One test failed with synchronize: {i}th assertion!")
0th test failed with non_blocking. Skipping remaining tests
No test failed with synchronize
通常,只有當目標是支援 CUDA 的裝置且原始張量在可分頁記憶體中時,到裝置的非同步複製才無需顯式同步。
總之,使用 non_blocking=True 複製資料從 CPU 到 GPU 是安全的,但對於任何其他方向,仍然可以使用 non_blocking=True,但使用者必須確保在訪問資料之前執行了裝置同步。
實際建議#
基於我們的觀察,我們可以開始總結一些早期建議
總的來說,non_blocking=True 將提供良好的吞吐量,無論原始張量是否在固定記憶體中。如果張量已經在固定記憶體中,傳輸可以加速,但從 Python 主執行緒手動將其傳送到固定記憶體是主機上的阻塞操作,因此會抵消使用 non_blocking=True 的大部分好處(因為 CUDA 無論如何都會執行 pin_memory 傳輸)。
現在,人們可能會合理地問 pin_memory() 方法有什麼用。在下一節中,我們將進一步探討如何使用它來進一步加速資料傳輸。
附加考慮#
PyTorch notoriously 提供了一個 DataLoader 類,其建構函式接受一個 pin_memory 引數。考慮到我們之前關於 pin_memory 的討論,你可能會想知道 DataLoader 如何設法加速資料傳輸,如果記憶體固定是固有阻塞的。
關鍵在於 DataLoader 使用一個單獨的執行緒來處理從可分頁記憶體到固定記憶體的資料傳輸,從而防止主執行緒中的任何阻塞。
為了說明這一點,我們將使用同名庫中的 TensorDict 原語。呼叫 to() 時,預設行為是非同步將張量傳送到裝置,然後呼叫一次 torch.device.synchronize()。
此外,TensorDict.to() 包括一個 non_blocking_pin 選項,它啟動多個執行緒來執行 pin_memory(),然後再繼續 to(device)。這種方法可以進一步加速資料傳輸,如下例所示。
from tensordict import TensorDict
import torch
from torch.utils.benchmark import Timer
import matplotlib.pyplot as plt

# Create the dataset
td = TensorDict({str(i): torch.randn(1_000_000) for i in range(1000)})

# Runtimes
copy_blocking = timer("td.to('cuda:0', non_blocking=False)")
copy_non_blocking = timer("td.to('cuda:0')")
copy_pin_nb = timer("td.to('cuda:0', non_blocking_pin=True, num_threads=0)")
copy_pin_multithread_nb = timer("td.to('cuda:0', non_blocking_pin=True, num_threads=4)")

# Rations
r1 = copy_non_blocking / copy_blocking
r2 = copy_pin_nb / copy_blocking
r3 = copy_pin_multithread_nb / copy_blocking

# Figure
fig, ax = plt.subplots()

xlabels = [0, 1, 2, 3]
bar_labels = [
    "Blocking copy (1x)",
    f"Non-blocking copy ({r1:4.2f}x)",
    f"Blocking pin, non-blocking copy ({r2:4.2f}x)",
    f"Non-blocking pin, non-blocking copy ({r3:4.2f}x)",
]
values = [copy_blocking, copy_non_blocking, copy_pin_nb, copy_pin_multithread_nb]
colors = ["tab:blue", "tab:red", "tab:orange", "tab:green"]

ax.bar(xlabels, values, label=bar_labels, color=colors)

ax.set_ylabel("Runtime (ms)")
ax.set_title("Device casting runtime")
ax.set_xticks([])
ax.legend()

plt.show()
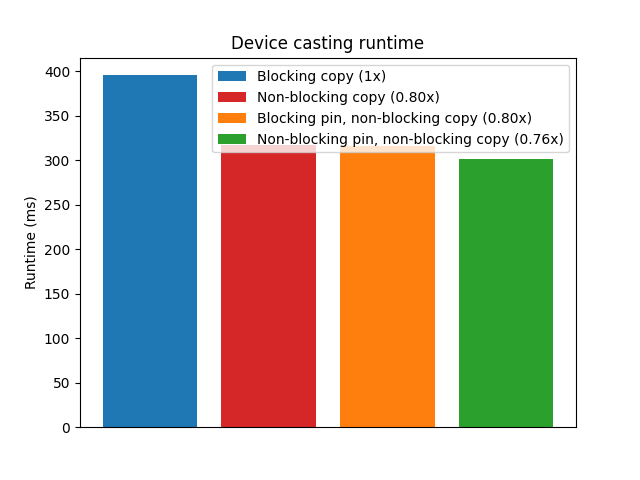
td.to('cuda:0', non_blocking=False):  395.2895 ms
td.to('cuda:0'):  317.1413 ms
td.to('cuda:0', non_blocking_pin=True, num_threads=0):  316.2662 ms
td.to('cuda:0', non_blocking_pin=True, num_threads=4):  301.1578 ms
在這個例子中,我們將許多大型張量從 CPU 傳輸到 GPU。這種情況非常適合利用多執行緒 pin_memory(),這可以顯著提高效能。但是,如果張量很小,多執行緒產生的開銷可能會超過收益。類似地,如果張量很少,將張量固定在單獨執行緒上的好處也有限。
另外需要注意的是,雖然建立固定記憶體中的永久緩衝區來在將張量從可分頁記憶體傳輸到 GPU 之前進行轉移似乎有利,但這種策略不一定會加快計算。將資料複製到固定記憶體所產生的固有瓶頸仍然是一個限制因素。
此外,將駐留在磁碟上的資料(無論是在共享記憶體還是檔案中)傳輸到 GPU 通常需要一箇中間步驟,即將資料複製到固定記憶體(位於 RAM 中)。在這種情況下,使用 non_blocking 進行大型資料傳輸可能會顯著增加 RAM 消耗,從而可能對系統性能產生不利影響。
實際上,沒有一種放之四海而皆準的解決方案。多執行緒 pin_memory 與 non_blocking 傳輸結合使用的有效性取決於多種因素,包括特定系統、作業系統、硬體以及正在執行的任務的性質。以下是在嘗試加速 CPU 和 GPU 之間資料傳輸或比較不同場景下的吞吐量時需要檢查的因素列表
可用核心數
有多少 CPU 核心可用?系統是否與其他可能爭奪資源的使用者的程序共享?
核心利用率
CPU 核心是否被其他程序大量使用?應用程式是否在進行資料傳輸的同時執行其他 CPU 密集型任務?
記憶體利用率
當前正在使用多少可分頁記憶體和頁面鎖定記憶體?是否有足夠的可用記憶體來分配額外的固定記憶體而不影響系統性能?請記住,沒有什麼是不需要代價的,例如
pin_memory會消耗 RAM 並可能影響其他任務。CUDA 裝置功能
GPU 是否支援多個 DMA 引擎進行併發資料傳輸?正在使用的 CUDA 裝置有哪些具體的功能和限制?
要傳送的張量數量
典型操作中有多少個張量被傳輸?
要傳送的張量大小
要傳輸的張量大小是多少?幾個大張量或許多小張量可能不會從相同的傳輸程式中受益。
系統架構
系統的架構如何影響資料傳輸速度(例如,匯流排速度、網路延遲)?
此外,在固定記憶體中分配大量張量或大小適中的張量可能會佔用大量 RAM。這減少了可用於其他關鍵操作(例如分頁)的可用記憶體,這可能會對演算法的整體效能產生負面影響。
結論#
在本教程中,我們探索了影響將張量從主機發送到裝置時的傳輸速度和記憶體管理的幾個關鍵因素。我們瞭解到使用 non_blocking=True 通常會加速資料傳輸,而 pin_memory() 如果實現得當,也可以提高效能。然而,這些技術需要仔細的設計和校準才能有效。
請記住,對程式碼進行效能分析並密切關注記憶體消耗對於最佳化資源使用和實現最佳效能至關重要。
其他資源#
如果您在使用 CUDA 裝置時遇到記憶體複製問題,或者想了解更多關於本教程中討論的內容,請參閱以下參考資料
指令碼總執行時間: (1 分鐘 2.950 秒)
