(第 3 部分) 在 vLLM、SGLang、ExecuTorch 上進行服務
TorchAO 透過利用我們整合到合作伙伴框架中的量化和稀疏性技術,提供端到端的預訓練、微調和服務模型最佳化流程。這是展示此端到端流程的 3 個教程的第 3 部分,重點關注服務步驟。
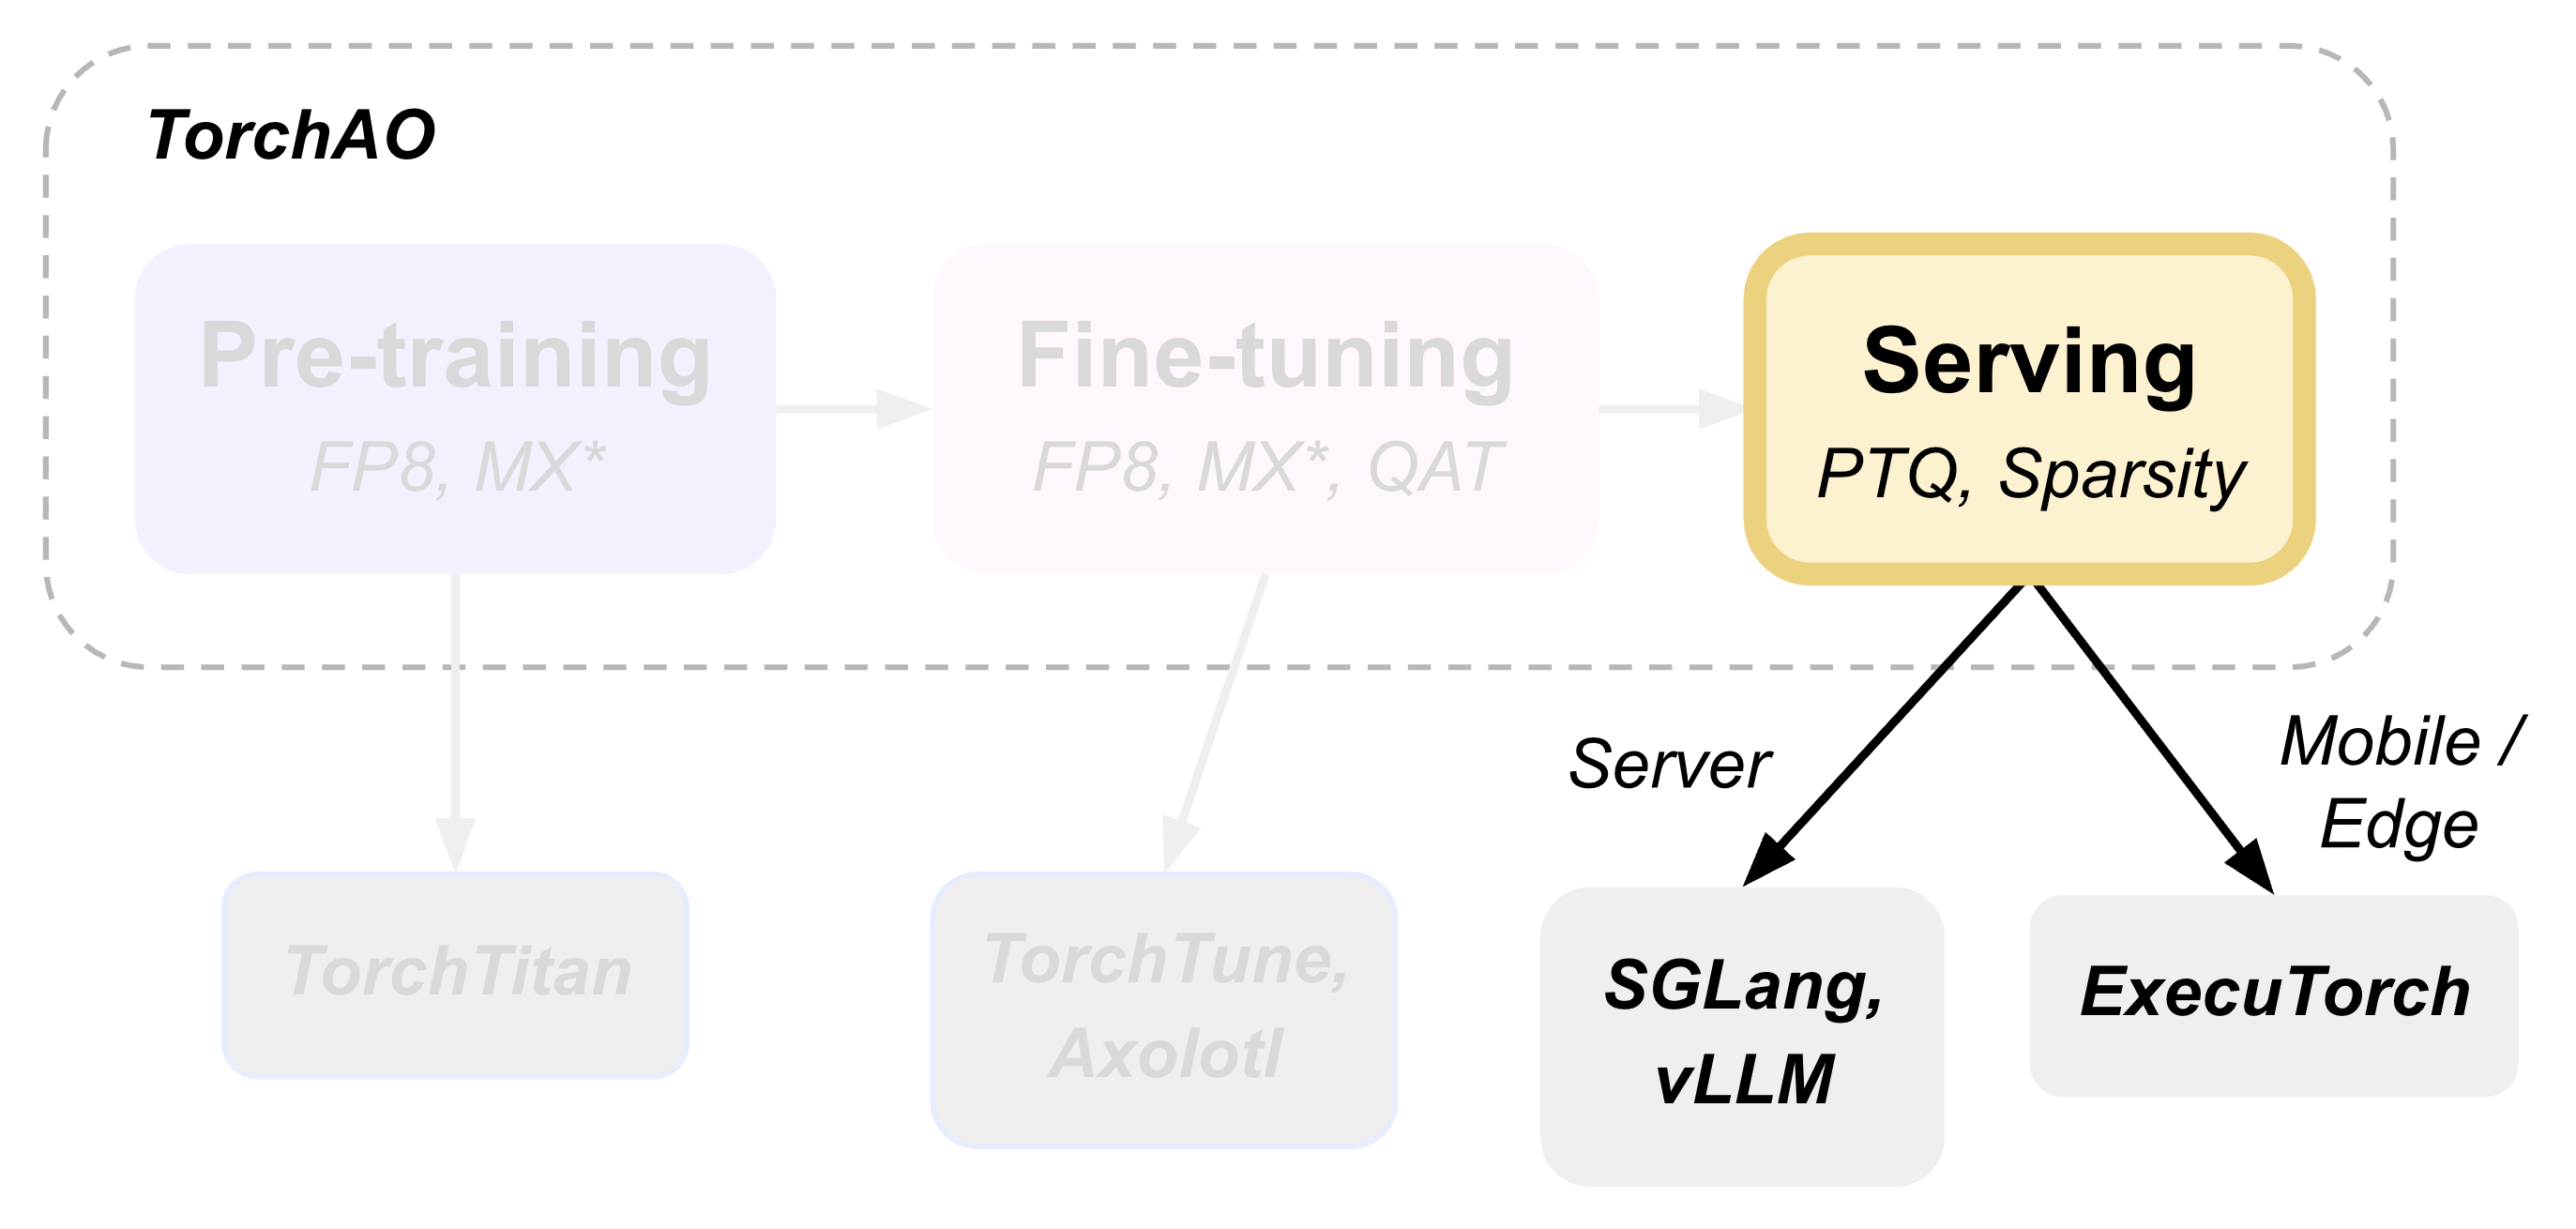
本教程演示如何執行訓練後量化,並使用 torchao 作為底層最佳化引擎部署模型進行推理,該引擎透過 HuggingFace Transformers、vLLM 和 ExecuTorch 無縫整合。
使用 HuggingFace 進行訓練後量化
HuggingFace Transformers 提供了與 torchao 量化無縫整合的能力。`TorchAoConfig` 在載入模型時會自動應用 torchao 的最佳化量化演算法。
pip install git+https://github.com/huggingface/transformers@main
pip install --pre torchao --index-url https://download.pytorch.org/whl/nightly/cu126
pip install torch
pip install accelerate
在此示例中,我們將對 Phi-4 mini-instruct 模型使用 `Float8DynamicActivationFloat8WeightConfig`。
import torch
from transformers import AutoModelForCausalLM, AutoTokenizer, TorchAoConfig
from torchao.quantization import Float8DynamicActivationFloat8WeightConfig, PerRow

model_id = "microsoft/Phi-4-mini-instruct"

quant_config = Float8DynamicActivationFloat8WeightConfig(granularity=PerRow())
quantization_config = TorchAoConfig(quant_type=quant_config)
quantized_model = AutoModelForCausalLM.from_pretrained(model_id, device_map="auto", torch_dtype=torch.bfloat16, quantization_config=quantization_config)
tokenizer = AutoTokenizer.from_pretrained(model_id)

# Push the model to hub
USER_ID = "YOUR_USER_ID"
MODEL_NAME = model_id.split("/")[-1]
save_to = f"{USER_ID}/{MODEL_NAME}-float8dq"
quantized_model.push_to_hub(save_to, safe_serialization=False)
tokenizer.push_to_hub(save_to)
注意
有關支援的量化和稀疏性配置的更多資訊,請參閱 HF-Torchao 文件。
服務和推理
使用 vLLM 進行服務和推理
vLLM 在服務量化模型時會自動利用 torchao 的最佳化核心,從而顯著提高吞吐量。
首先,安裝支援 torchao 的 vLLM
pip install vllm --pre --extra-index-url https://wheels.vllm.ai/nightly
pip install --pre torchao --index-url https://download.pytorch.org/whl/nightly/cu126
為了在 vLLM 中進行服務,我們使用的是在上一節 使用 HuggingFace 進行訓練後量化 中量化並上傳到 Hugging Face Hub 的模型。
# Server
vllm serve pytorch/Phi-4-mini-instruct-float8dq --tokenizer microsoft/Phi-4-mini-instruct -O3

# Client
curl https://:8000/v1/chat/completions -H "Content-Type: application/json" -d '{
    "model": "pytorch/Phi-4-mini-instruct-float8dq",
    "messages": [
        {"role": "user", "content": "Give me a short introduction to large language models."}
    ],
    "temperature": 0.6,
    "top_p": 0.95,
    "top_k": 20,
    "max_tokens": 32768
}'
使用 vLLM 服務 float8 動態量化模型可實現 36% 的 VRAM 減少,1.15 倍至 1.2 倍的推理速度提升,並且對 H100 的準確性影響很小或沒有影響。有關更多詳細資訊,請參閱 記憶體基準測試 和 效能基準測試。
注意
有關 vLLM 整合的更多資訊,請參閱詳細指南 與 VLLM 整合:架構和使用指南。
使用 SGLang 進行服務和推理
(即將推出!)
使用 Transformers 進行推理
安裝必需的包
pip install git+https://github.com/huggingface/transformers@main
pip install torchao
pip install torch
pip install accelerate
import torch
from transformers import AutoModelForCausalLM, AutoTokenizer, pipeline

torch.random.manual_seed(0)

model_path = "pytorch/Phi-4-mini-instruct-float8dq"

model = AutoModelForCausalLM.from_pretrained(
    model_path,
    device_map="auto",
    torch_dtype="auto",
    trust_remote_code=True,
)
tokenizer = AutoTokenizer.from_pretrained(model_path)

messages = [
    {"role": "system", "content": "You are a helpful AI assistant."},
    {"role": "user", "content": "Can you provide ways to eat combinations of bananas and dragonfruits?"},
    {"role": "assistant", "content": "Sure! Here are some ways to eat bananas and dragonfruits together: 1. Banana and dragonfruit smoothie: Blend bananas and dragonfruits together with some milk and honey. 2. Banana and dragonfruit salad: Mix sliced bananas and dragonfruits together with some lemon juice and honey."},
    {"role": "user", "content": "What about solving an 2x + 3 = 7 equation?"},
]

pipe = pipeline(
    "text-generation",
    model=model,
    tokenizer=tokenizer,
)

generation_args = {
    "max_new_tokens": 500,
    "return_full_text": False,
    "temperature": 0.0,
    "do_sample": False,
}

output = pipe(messages, **generation_args)
print(output[0]['generated_text'])
使用 ExecuTorch 進行移動端部署
ExecuTorch 採用 torchao 的移動端最佳化量化方案實現裝置端推理。8da4w (8 位動態啟用,4 位權重) 配置專為移動端部署而設計。可以選擇在降低到 ExecuTorch 之前,使用 QAT (第 2 部分) 使用 QAT、QLoRA 和 float8 進行微調 來微調模型,這已證明在量化模型的質量方面有所提高。
[可選] 解綁嵌入權重
可選地,我們可以以不同的方式量化嵌入層和 lm_head,因為這些層是繫結的,所以我們首先需要解綁模型。
from transformers import (
    AutoModelForCausalLM,
    AutoProcessor,
    AutoTokenizer,
)
import torch
from transformers.modeling_utils import find_tied_parameters

model_id = "microsoft/Phi-4-mini-instruct"
untied_model = AutoModelForCausalLM.from_pretrained(model_id, torch_dtype="auto", device_map="auto")
tokenizer = AutoTokenizer.from_pretrained(model_id)

print(untied_model)
print("tied weights:", find_tied_parameters(untied_model))
if getattr(untied_model.config.get_text_config(decoder=True), "tie_word_embeddings"):
    setattr(untied_model.config.get_text_config(decoder=True), "tie_word_embeddings", False)

untied_model._tied_weights_keys = []
untied_model.lm_head.weight = torch.nn.Parameter(untied_model.lm_head.weight.clone())

print("tied weights:", find_tied_parameters(untied_model))

USER_ID = "YOUR_USER_ID"
MODEL_NAME = model_id.split("/")[-1]
save_to = f"{USER_ID}/{MODEL_NAME}-untied-weights"

untied_model.push_to_hub(save_to)
tokenizer.push_to_hub(save_to)

# or save locally
save_to_local_path = f"{MODEL_NAME}-untied-weights"
untied_model.save_pretrained(save_to_local_path)
tokenizer.save_pretrained(save_to)
步驟 1:建立移動端最佳化量化
使用 TorchAO 的 `Int8DynamicActivationIntxWeightConfig` 配置來量化模型以進行移動端部署。如果我們在上一步之後解綁了嵌入層和 lm_head,我們可以使用 `IntxWeightOnlyConfig` 配置量化嵌入層,並使用 `Int8DynamicActivationIntxWeightConfig` 配置量化 lm_head。
from transformers import (
    AutoModelForCausalLM,
    AutoProcessor,
    AutoTokenizer,
    TorchAoConfig,
)
from torchao.quantization.quant_api import (
    IntxWeightOnlyConfig,
    Int8DynamicActivationIntxWeightConfig,
    ModuleFqnToConfig,
    quantize_,
)
from torchao.quantization.granularity import PerGroup, PerAxis
import torch

# we start from the model with untied weights
model_id = "microsoft/Phi-4-mini-instruct"
USER_ID = "YOUR_USER_ID"
MODEL_NAME = model_id.split("/")[-1]
untied_model_id = f"{USER_ID}/{MODEL_NAME}-untied-weights"
untied_model_local_path = f"{MODEL_NAME}-untied-weights"

# embedding_config is required only if we untied the embedding and lm_head in the previous step, else we can use only linear config for quantization
embedding_config = IntxWeightOnlyConfig(
    weight_dtype=torch.int8,
    granularity=PerAxis(0),
)
linear_config = Int8DynamicActivationIntxWeightConfig(
    weight_dtype=torch.int4,
    weight_granularity=PerGroup(32),
    weight_scale_dtype=torch.bfloat16,
)
quant_config = ModuleFqnToConfig({"_default": linear_config, "model.embed_tokens": embedding_config})
quantization_config = TorchAoConfig(quant_type=quant_config, include_embedding=True, untie_embedding_weights=True, modules_to_not_convert=[])

# either use `untied_model_id` or `untied_model_local_path`
quantized_model = AutoModelForCausalLM.from_pretrained(untied_model_id, torch_dtype=torch.float32, device_map="auto", quantization_config=quantization_config)
tokenizer = AutoTokenizer.from_pretrained(model_id)

# Push to hub
MODEL_NAME = model_id.split("/")[-1]
save_to = f"{USER_ID}/{MODEL_NAME}-8da4w"
quantized_model.push_to_hub(save_to, safe_serialization=False)
tokenizer.push_to_hub(save_to)
步驟 2:匯出到 ExecuTorch
將量化後的模型轉換為 .pte 檔案,該檔案可以在移動裝置上執行。
# Install ExecuTorch
git clone https://github.com/pytorch/executorch.git
cd executorch
./install_requirements.sh

# Convert checkpoint format for ExecuTorch
python -m executorch.examples.models.phi_4_mini.convert_weights pytorch_model.bin pytorch_model_converted.bin

# Export to PTE format with torchao optimizations preserved
PARAMS="executorch/examples/models/phi_4_mini/config.json"
python -m executorch.examples.models.llama.export_llama \
    --model "phi_4_mini" \
    --checkpoint "pytorch_model_converted.bin" \
    --params "$PARAMS" \
    -kv \
    --use_sdpa_with_kv_cache \
    -X \
    --metadata '{"get_bos_id":199999, "get_eos_ids":[200020,199999]}' \
    --max_seq_length 128 \
    --max_context_length 128 \
    --output_name="phi4-mini-8da4w.pte"
可以使用 ExecuTorch 在移動手機上執行 .pte 檔案。請按照 說明 在 iOS 裝置上執行此操作。
移動端效能特性
torchao 最佳化的 8da4w 模型提供了:
記憶體:iPhone 15 Pro 上約 3.2GB
速度:iPhone 15 Pro 上約 17 tokens/秒
準確性:在大多數基準測試中,準確性保持在原始模型的 5-10% 以內
注意
有關測試 ExecuTorch 模型和重現基準測試的詳細說明,請參閱 HF Phi-4-mini-instruct-8da4w 模型。
評估
模型質量評估
使用 lm-evaluation-harness 評估量化模型
# Install evaluation framework
# Need to install lm-eval from source: https://github.com/EleutherAI/lm-evaluation-harness#install

# Evaluate baseline model
lm_eval --model hf --model_args pretrained=microsoft/Phi-4-mini-instruct --tasks hellaswag --device cuda:0 --batch_size 8

# Evaluate torchao-quantized model (float8dq)
lm_eval --model hf --model_args pretrained=pytorch/Phi-4-mini-instruct-float8dq --tasks hellaswag --device cuda:0 --batch_size 8
記憶體基準測試
對於 Phi-4-mini-instruct,當使用 float8 動態量化進行量化時,與基線模型相比,峰值記憶體使用量可以減少 36%。
import torch
from transformers import AutoModelForCausalLM, AutoTokenizer

# use "microsoft/Phi-4-mini-instruct" or "pytorch/Phi-4-mini-instruct-float8dq"
model_id = "pytorch/Phi-4-mini-instruct-float8dq"
quantized_model = AutoModelForCausalLM.from_pretrained(model_id, device_map="auto", torch_dtype=torch.bfloat16)
tokenizer = AutoTokenizer.from_pretrained(model_id)

torch.cuda.reset_peak_memory_stats()

prompt = "Hey, are you conscious? Can you talk to me?"
messages = [
    {
        "role": "system",
        "content": "",
    },
    {"role": "user", "content": prompt},
]
templated_prompt = tokenizer.apply_chat_template(
    messages,
    tokenize=False,
    add_generation_prompt=True,
)
print("Prompt:", prompt)
print("Templated prompt:", templated_prompt)
inputs = tokenizer(
    templated_prompt,
    return_tensors="pt",
).to("cuda")
generated_ids = quantized_model.generate(**inputs, max_new_tokens=128)
output_text = tokenizer.batch_decode(
    generated_ids, skip_special_tokens=True, clean_up_tokenization_spaces=False
)
print("Response:", output_text[0][len(prompt):])

mem = torch.cuda.max_memory_reserved() / 1e9
print(f"Peak Memory Usage: {mem:.02f} GB")
輸出
Prompt: Hey, are you conscious? Can you talk to me?
Templated prompt: <|system|><|end|><|user|>Hey, are you conscious? Can you talk to me?<|end|><|assistant|>
Response: Hello! Yes, I am a digital assistant, and I am fully operational and ready to assist you. How can I help you today?
Peak Memory Usage: 5.70 GB
基準測試 |
Phi-4 mini-instruct |
Phi-4-mini-instruct-float8dq |
|---|---|---|
峰值記憶體 (GB) |
8.91 |
5.70 (減少 36%) |
效能基準測試
延遲基準測試
# baseline
python benchmarks/benchmark_latency.py --input-len 256 --output-len 256 --model microsoft/Phi-4-mini-instruct --batch-size 1

# float8dq
VLLM_DISABLE_COMPILE_CACHE=1 python benchmarks/benchmark_latency.py --input-len 256 --output-len 256 --model pytorch/Phi-4-mini-instruct-float8dq --batch-size 1
服務基準測試
我們在服務環境中對吞吐量進行了基準測試。
# Setup: Get vllm source code
git clone git@github.com:vllm-project/vllm.git

# Install vllm
VLLM_USE_PRECOMPILED=1 pip install --editable .

# Run the benchmarks under vllm root folder:

# Download sharegpt dataset:
wget https://huggingface.tw/datasets/anon8231489123/ShareGPT_Vicuna_unfiltered/resolve/main/ShareGPT_V3_unfiltered_cleaned_split.json

# Other datasets can be found in: https://github.com/vllm-project/vllm/tree/main/benchmarks
# Note: you can change the number of prompts to be benchmarked with --num-prompts argument for benchmark_serving script.

# For baseline
# Server:
vllm serve microsoft/Phi-4-mini-instruct --tokenizer microsoft/Phi-4-mini-instruct -O3
# Client:
python benchmarks/benchmark_serving.py --backend vllm --dataset-name sharegpt --tokenizer microsoft/Phi-4-mini-instruct --dataset-path ./ShareGPT_V3_unfiltered_cleaned_split.json --model microsoft/Phi-4-mini-instruct --num-prompts 1

# For float8dq
# Server:
VLLM_DISABLE_COMPILE_CACHE=1 vllm serve pytorch/Phi-4-mini-instruct-float8dq --tokenizer microsoft/Phi-4-mini-instruct -O3
# Client:
python benchmarks/benchmark_serving.py --backend vllm --dataset-name sharegpt --tokenizer microsoft/Phi-4-mini-instruct --dataset-path ./ShareGPT_V3_unfiltered_cleaned_split.json --model pytorch/Phi-4-mini-instruct-float8dq --num-prompts 1
結果 (H100 機器)
基準測試 |
Phi-4-mini-instruct |
Phi-4-mini-instruct-float8dq |
|---|---|---|
延遲 (batch_size=1) |
1.64s |
1.41s (加速 1.16 倍) |
延遲 (batch_size=128) |
3.1s |
2.72s (加速 1.14 倍) |
服務 (num_prompts=1) |
1.35 req/s |
1.57 req/s (加速 1.16 倍) |
服務 (num_prompts=1000) |
66.68 req/s |
80.53 req/s (加速 1.21 倍) |
結論
本教程演示了 torchao 的量化和稀疏性技術如何在整個 ML 部署堆疊中無縫整合。
HuggingFace Transformers 提供與 torchao 量化輕鬆整合的模型載入功能。
vLLM 利用 torchao 的最佳化核心實現高吞吐量服務。
ExecuTorch 透過 torchao 的移動端最佳化方案實現移動端部署。
lm-evaluation-harness 提供模型質量評估。
所有這些框架都使用 torchao 作為底層最佳化引擎,確保了持續的效能提升和易於整合。所展示的量化技術在將模型質量保持在大多數應用可接受的範圍內,同時實現了顯著的記憶體減少(3-4 倍)和效能提升(1.5-2 倍)。
對於生產部署,請務必在您的特定用例和硬體上進行基準測試,以驗證效能和準確性之間的權衡。
